Showing posts with label Hair Accessories. Show all posts

Monday, October 10, 2016

I Got A Heat Press!!

Okay guys, I have big news! I got a heat press!!! I'm so excited! My mom and dad got it for me as a birthday/Christmas gift, and this has been such a game changer for me with shirt making! This is the one I got:


It came with attachments to also do hats, 2 sizes of plates, and 2 sizes of mugs. This thing is so awesome! Not only is it crazy faster than applying heat transfer vinyl with an iron, the quality of the finished product is miles better! What really surprised me though was the fact that you can re-press old projects that have maybe started to peel a bit and fix them! I've been playing with htv for about a year now, and I've loved working with it, but I've always been a little disappointed that it didn't seem to hold up very well in the wash. Well this has been the answer to that for sure. My new projects as well as old ones that I repaired are now holding up perfectly in the washing machine! And I have LOVED being able to rescue some ragged favorites that seemed destined for the trash. I had just assumed that once an item had gone through the laundry there would be no way to make the htv stick. Not that every single project I did with an iron started to peel, but well, a good percentage of them eventually did. So if I've made you a gift with htv in the past and it's starting to come off, bring it back and I'll fix it right up!

My nephew Levi's birthday party is this Saturday. He's going to be four, and he looooves superheros, Batman especially. I made him this t-shirt, as well as a pillow with Superman fabric on one side and Batman fabric on the other. I also added his name to the pillow in htv. The Batman decal below is actually a 3D rubber applique that I found at Walmart for $3.97. The instructions included were for a household iron, but I took a chance and applied it with the heat press, and it turned out amazing!


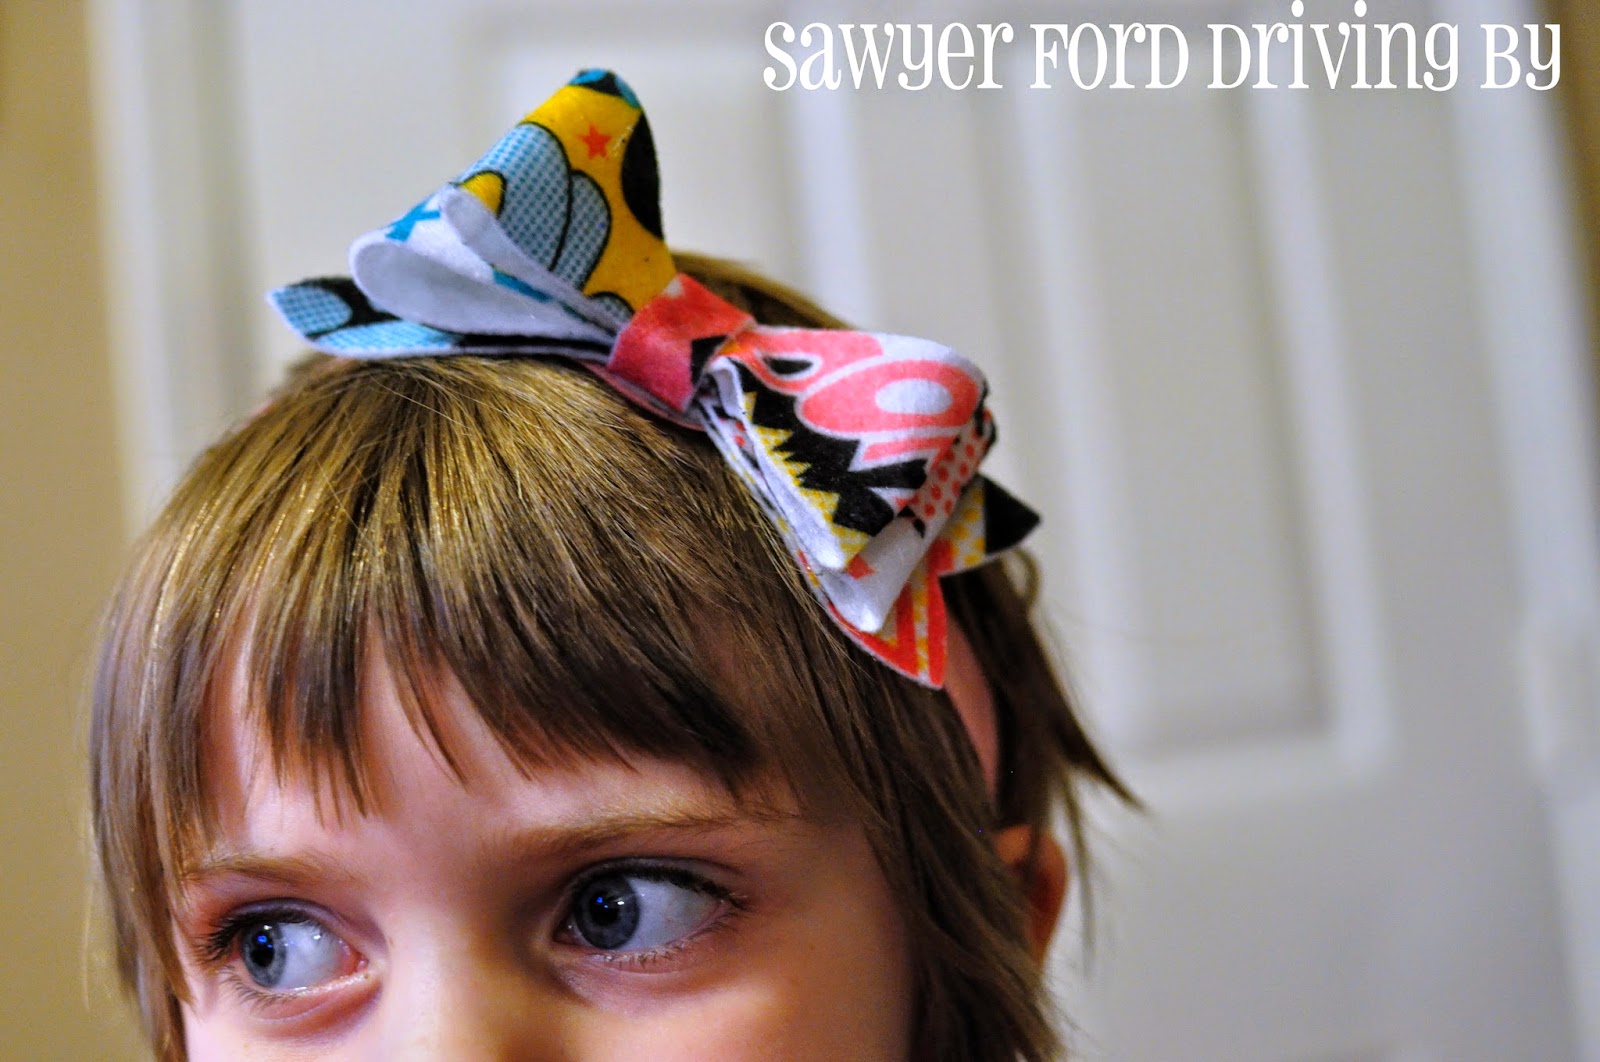
Lily wanted a superhero shirt for her birthday to wear to Levi's party. She originally wanted a Wonder Woman shirt, but then she saw a pink and black Batman shirt online and wanted it instead. So what's a mama with a brand new heat press supposed to do besides make them both? The Batman shirt she saw had a matching bow, so I made one to match each shirt. I even used the heat press for the bows! I don't know why the Wonder Woman set looks pink in the picture below, but as you can see in the shot with her wearing them they are red. Both shirts were the basic $2.97 boys tees from Walmart, and I had the ribbon and htv on hand, so this was a really inexpensive gift.


The gold HTV on this shirt was in an Expressions Vinyl grab bag that arrived on her birthday, and it was perfect for this project. I mentioned when I shared this picture on Instagram, isn't it neat how God loves on us in little ways as well as big ways?

Sawyer wants a superhero shirt too, but he keeps going back and forth on what kind, so I will be making one or two for him as well. 

I plan on offering some items in my shop soon too.

Heat press for the win!

Wednesday, November 19, 2014

Therapeutic Crafting

Life is best for me when I take time to make things. Sometimes when I get overwhelmed with kids and housework and errands and everything that goes with having a full, although beautiful life, I have to put myself in front of my sewing machine or turn on my glue gun or pull out my jewelry wire, or just create something that wasn't there before. It doesn't have to be anything big or elaborate, but just the process of making something appealing is balm to my soul. This past week or so has been full of tiny projects. Excuse some of the photos as cell phone pics not actually intended for the blog. :)

I've made up a few hair bows, like these Frozen themed ones. My friend Amy's little girls were going to see Frozen on Ice that evening, and she called and asked if she could bring me some ribbon and have me come up with some quick bows to match their dresses.


She also dropped off a roll of this Christmas ribbon she found at the thrift store for 49¢, so I made this one too.


Her youngest daughter is turning three in a few days and will be celebrating with a Jake and the Neverland Pirates themed party, so I made this one for the birthday girl.

I made Lily this woven headband to match my niece's Thanksgiving headband. Clearly this is one of the not-actually-taken-for-the-blog-pics. 


And I found this velvet ribbon in my stash, and I don't think I'd ever laid eyes on it before. Sometimes people pass along to me random craft supplies they're getting rid of. Like this one time my Aunt Tina gave me bags full of vintage lace and trim and ribbon and fabric remnants and it was basically the best thing ever. And I don't think this ribbon came from her, but it found its way to me in much the same manner, and I kind of love it, so thank you to whoever gave it to me. I made this sweet bow that is going to look awesome with some little girl's pretty velvet Christmas dress!


I made my niece this ginormous rosette headband using the remnants of the blanket I made her. It's so soft!


My friend Rebecca asked me to make her daughter a leather and stamped copper cuff. She couldn't decide which color she wanted so I made up an extra leather strap she can switch the plate out on if she likes.


I also made myself a new pincushion out of this sweet little vintage tart tin I found at a thrift store. I have some similar cupcake tins I plan on turning into pincushions too, so I will do a tutorial in the near future.


I've been playing with the Gift Box Punch Board my mom got me for my birthday, and I'll do a tutorial on it coming up. So fun!


And I finally found the pinwheel attachments to use with the Pinwheel Punch Board, so that will be on the blog soon too!


My daughter Taylor has been feeling a bit crafty herself. She made this sweet paper banner that says ROACH FAMILY. And why yes, that is a sippy cup so fetchingly displayed on my mantle. Don't be jealous.


She also made these awesome scrapbook paper snowflakes and decorated the wall at the stair landing. I love how unique and festive they all are!


What sort of crafts do you find relaxing and therapeutic?

Sunday, November 2, 2014

Thanksgiving Headband

Happy November! Can you even believe it's almost Thanksgiving already? And that means it's just a hop, skip, and a jump to......Christmas. I don't want to talk about it. I could not be more unprepared.

What I do have prepared though is a tutorial for a very cute headband for the toddler or baby girl in your life!


This one went to my gorgeous niece Adelaide, but I will probably make another one for Lily so they can match.

To make this easy headband, first you will need a leaf/petal shape in 3 graduating sizes cut from cardstock. I just free-handed a design for the first one, cut it out, then cut around it a bit bigger to get the middle size one, then cut around that one to get the biggest. Trust me, I am not what you would call skilled at drawing or cutting things out, so if I can do this, so can you. My smallest shape was about 1.5 inches high, and they went up from there.


Now you want to choose three colors of felt. For the turkey of course I went with yellow orange and brown, but this basic construction can be made with lots of different themes.


Decide what order you want your colors to be layered, and cut nine petals of the largest size from the back color, 9 of the medium size from the middle color, and 9 of the small size from the top color.


Stack them like this, gluing them together with hot glue. Repeat with the rest of the petals until you have 9 petal stacks.


Next, run a short line of glue down from the middle of the bottom part of the smallest petal to the bottom edge of the biggest petal like this.


Then pinch the bottom of the petal stack together and hold for a few seconds till the glue sets. Repeat for the other 9 petal stacks.


You will also need a scrap piece of felt cut 1 x 3 inches.


Now, run a line of glue on the lower half of the side of one of the petal stacks and glue another petal stack right beside it. 


Glue another one to the side of that one, so that you have three petal stacks glued side by side at the base. Repeat that with the rest of the petal stacks so that you have three sets of three side by side petals. Glue them to the scrap of felt, starting at the top and moving down, overlapping each one just a little and leaving a little bit of room at the bottom for the turkey.


Now for the actual turkey I used one of these fun little felt stickers that got in a 7 pack at Michael's for $1.00.


Just glue it right to the bottom of the felt strip, overlapping the bottom layer of petals. I didn't remove the white paper from the back of the turkey, because I didn't want the adhesive exposed since it is not laying against a flat surface.


Look how cute already! Wouldn't it also make a great embellishment for a gift bag or even a little Thanksgiving shirt?

Now cut a length of elastic appropriate to the size headband you want to make. This was a fold over elastic hair tie I got in a six pack at the Dollar Tree and just untied, thus the wrinkled end. Glue the elastic into a circle, overlapping the ends.


Glue your turkey embellishment to the headband and you're all done!


Monday, July 14, 2014

Sizzix Gift Bow Bigz L Die by Stampin' Up

First of all, this is not a sponsored post. I purchased this die, and I just wanted to share how much I love it.

Back when I made the leather hair bows for Taylor's 13th birthday party, I cut them all by hand. And it wasn't hard, just time consuming. And there were some slight variations in each bow because scissors + my cutting by hand skills. At the time I looked for a Sizzix die to use, because I love my Sizzix Big Kick like a small child, but I couldn't find one that I liked and that would cut leather.

Then my friend Shawna started selling Stampin' Up products, and they had the perfect die! This is a Stampin' Up exclusive, so you can only get it through a demonstrator. And I don't get anything for referring you, but if you're looking for a demonstrator, I would highly recommend Shawna. She's kind of awesome. :) You can shop with her here.

You'll have to excuse these pictures because some of them were quick cellphone shots before heading out the door with a birthday gift. I have found that if you fold a standard piece of craft felt in half it will fit over the die perfectly and make exactly enough pieces for one regular bow and one double bow. I actually cut out a longer center strip from the felt remnant for the double bow just because the strip cut by the die is not long enough to wrap around all the layers. Of course if you are working with paper or cardstock it will be plenty long enough.


These were for the daughter of one of Nick's friends.


The other little flowers and bows were pre-made embellishments I got on clearance at Michael's and stuck on lined clips. Easy peasy!


These are so fun!


I added this one to a headband for my precious new niece Adelaide. Since I have no tiny baby girls in my house anymore, my lampshade got to be my model. Um, I need to dust.


This one is for my friend Amy's little girl Abi. 


I recently got to pass down to her a little pillowcase dress I made for Lily when she was itty bitty, and this bow matches it. Gratuitous (old) pictures of baby Lily that sort of show off the dress:


I'm dying a little from the cuteness. Those eyes! And those cheeks! Nom, nom, nom...

This one I added to a headband for big, grown up, already has a second loose tooth (sob!) Lily.


Oh my goodness, those giant Disney princess eyes...

You can of course use this die for paper gift bows too. I also made one from some yummy green leather, but Taylor confiscated it before I could snap a pic. :) I can see a lot more of these in my future!


Thursday, May 15, 2014

Boutique Bows

As a mom to two girls, I love me some bows! And I love making bows for them. And I've made some big crazy complicated ones, but my go to favorite is the basic boutique bow. Now there are tutorials all over Pinterest for how to make these, so I certainly can't claim this is an original design, but I thought I'd share some tips that I use.

First of all, ribbon. You can use all kinds of ribbon for these, but it's hard to beat grosgrain. Satin will work, but unless the bows are on the small side, they won't hold their shape very well. Organza can be a little thin and tends to be hard to seal neatly. And wired will bend into a wonky shape at the first bump.


These are the basic supplies you will need:

Ribbon
Needle and thread
Lighter for sealing
Center Embellishments
Metal Super Clip
Lined Clips
Not shown:scissors, glue gun, ruler

The metal super clips come in a 6 pack. I got mine at Sally Beauty Supply for under $4. (Not an affiliate link) These are the key to making this an easy process.


First cut your ribbon. The narrower the ribbon, the smaller you're going to want to make your bow. I've found that good lengths are as follows:

1.5 inch ribbon - 24 inches
7/8 or 1 inch ribbon - 18 inches
5/8 inch ribbon - 12 inches

You're going to start by folding your ribbon in a squashed down zigzag pattern and centering it in the clip like this:


Then take your needle and thread and run a long basting stitch from bottom to top.


Remove the clip and pull the thread tight, gathering the ribbon in the center. Wrap the thread around the gathered center 5 or 6 times and tie off in the back.


I like to feed the needle through the tightened thread around the center when tying my knot to make it secure.


Take a minute to straighten out your loops and tails.


Hot glue a gem, button, or other embellishment to the center.


Grab a lined clip. I took the opportunity to make up a few.


Add your glue right to the top of the clip and stick your bow on.


These small ones are great in pairs for pigtails.

If you want, you can notch the tails. Just fold the ends of the ribbon in half and cut a slant starting at the side with the edges and leading up toward the fold.


Be sure to seal your new edges.


The bigger ribbon is a little harder to work with as the zigzag will be taller than your clip, but it's still manageable.


The biggest thing is to just make sure you don't sew the top of your clip to the ribbon.


Feed the needle under the clip at the top like so:


I love how this one made a flower in the center!


Don't you love this red, black, and white dot ribbon? Very Minnie-esqe!


These are quick to make up, and easy to match to an existing outfit!