Showing posts with label kids. Show all posts

Saturday, October 8, 2016

A Birthday Banner for the Birthday Girl

So this girl turned SEVEN on Wednesday! I can't even handle this. She just got out of diapers, I swear.


We had a simple family get together at the house on Tuesday, and I made this Happy Birthday Banner to hang in the dining room. I used 4 sheets of kraft cardstock and 2 sheets of scrapbook paper. I cut the cardstock in fourths (I had 3 extra fourths), and cut the scrapbook paper into 3"x 5" pieces to use in my Alphabet Punch Board. I ran the letters through my Xyron Creative Station to adhere them to the cardstock and strung it all on baker's twine. I think I'm going to take the BIRTH off now that we're done so that it just says Happy Day and hang it in her room.


Man, I love banners! This is one I made a couple of weeks ago for a baby shower at church. I cut the flags using my paper cutter, the letters using my Alphabet Punch Board, and the deer using a paper punch. I ran all the letters and the deer through my Xyron Creative Station to turn them into stickers which made the assembly super quick. Colton's mom is doing his nursery in an outdoorsy theme, so hopefully she can use it in there too. 

Tuesday, July 26, 2016

Showers of Blessings


Guys, I just had to pop in for a minute and tell you how God has blessed me over the last few days. And because every post needs a picture, I'm sharing a quick snap of Sawyer's gallery wall in progress. Everything on it was either thrifted, on clearance, or handmade. Sometime soon I plan to post about all that wood burned art.

Anyway, I just wanted to share how good to me God has been this week. I've been kind of stressed the last few days. We just finished up Vacation Bible School at our church (which was awesome - eight kids saved!). I'm in charge of the crafts every year, which I love, but it's always exhausting. And this month it just seems like the bills have been rolling in and I'm trying to wrap my head around the fact that school starts back in less than two weeks and it didn't look like Sawyer was going to be able to get into the preschool program we were hoping for and I was trying to figure out the school clothes situation for these kiddos that are growing like weeds, etc. etc. etc.

Man, I tell you what - God has got us covered! A few days ago a friend at church shared a link to Schoola.  Full disclosure, that is my referral link, but this is not a compensated post. I'm sharing it because I got some amazing deals and I want to share the love. Schoola is a program that collects gently used clothing and resells them at awesome prices to benefit schools. When you sign up (for
free) through a referral link like mine you get a $20 credit. Then if you create a collection (also free),
you get another $10 credit. They also immediately email you a 50% off coupon which makes your $30 in credit worth $60. And shipping is free! And if you go through my link, I get a $20 credit too.

So let me tell you what I've gotten with my sign up credits and referral credits so far: for Taylor I got 3 shirts, 2 sweaters, one pair of jeans, one pair of shorts, and a hoodie. For Lily I got 2 shirts, 7 pairs of pants, 3 dresses, 2 skirts, and a coat. For Sawyer I got 6 shirts, one pair of pants, one pair of shorts, and a pair of shoes. And I even got a shirt for me! That's $351.50 worth of clothes, and I've spent $3.30 out of pocket. I've gotten to use a coupon on every order so far, and I'm hoping to get a few more referrals to round out a few more pairs of pants for Sawyer, so if you want to sign up and get
some awesome name brand clothes for your kids or yourself for free, I would really appreciate you using my link above.

And speaking of Sawyer and school, I got a call today that Sawyer is going to be able to participate in the preschool program we wanted after all! Guys, this is a HUGE blessing, and a very direct answer to a specific prayer!

I also got a couple of surprise cards earlier this week - one from a sweet lady at church that was just a very precious and encouraging note that really brightened my day, and one from my secret sister with a gift card in it! That's going to be the start of my fund for my Workbox 2.0!

Kind of the icing on the cake today was this little reminder I got when I was fixing dinner:


This was on the back of the bag of chicken I was baking, and it is my very favorite verse! Isn't it neat how God loves on us?

Happy Tuesday, guys!

Friday, October 23, 2015

Lily's Birthday Skates


My Lily girl turned 6 on October 5. S-I-X! I never gave permission for this growing up business. Hmph!


Anyway, last year I made most of her gifts, and we did the whole awesome Adopt-A-Baby Party. We decided not to do big friend birthday parties for the kids this year because of the house being on the market, and with most of my craft supplies in storage, I didn't do much with handmade gifts.

We did have a small family gathering at the house though, and I did do a bit of upcycling on one gift, which turned out to be her favorite. A month or so ago she was invited to her first school friend birthday party. Have I mentioned that this girl started kindergarten in August? I didn't? Oh that's right, it's because I'm still in denial. But pushing onward, this birthday party was held at the skating rink. Let me just inject a hard earned word of wisdom for you here: don't wear flip-flops to a 6 year old's skating party, and no I don't care to discuss it further. Lesson learned. Anyway, she started out very scared of the whole concept of skating, but by the end of the party I had to dodge speeding skaters to make my way out to the center of the rink to rescue her where she had ventured out and ended up on the floor with no nearby rails on which to pull herself up. She was sold on the wheeled lifestyle.

A few days before her birthday I was at the thrift store and came across these well loved Barbie skates in her size for $3.99.


As you can see, they had some major scuffing on the toes.


So I headed to Walmart where I grabbed a 75 cent clearance fat quarter and a $1 roll of pompom trim from their Halloween ribbon selection. I used a piece of scrap fabric to lay over the toe of one skate to trace around and get a rough idea of the shape I would need to cover the damage, then used that as a template to cut the pieces out of my fat quarter. Then I used Aleene's Original Tacky Glue to adhere the fabric to the toe, and carefully trimmed away any excess with my Xacto knife. I cut two pieces of trim for each skate, one to go across the top edge of the fabric and one to go around the base of the toe, then hot glued them down using my glue gun on the high setting. Then I snipped off the bows and made new ones using the fat quarter, although I did reuse the center bands since they were in good shape. I just hot glued these back on using the high setting again.


If I do this again, I will seal the fabric with Mod Podge to make them easier to wipe down, but this was completed just a little while before she got home from school, so there wasn't really time to let it dry.


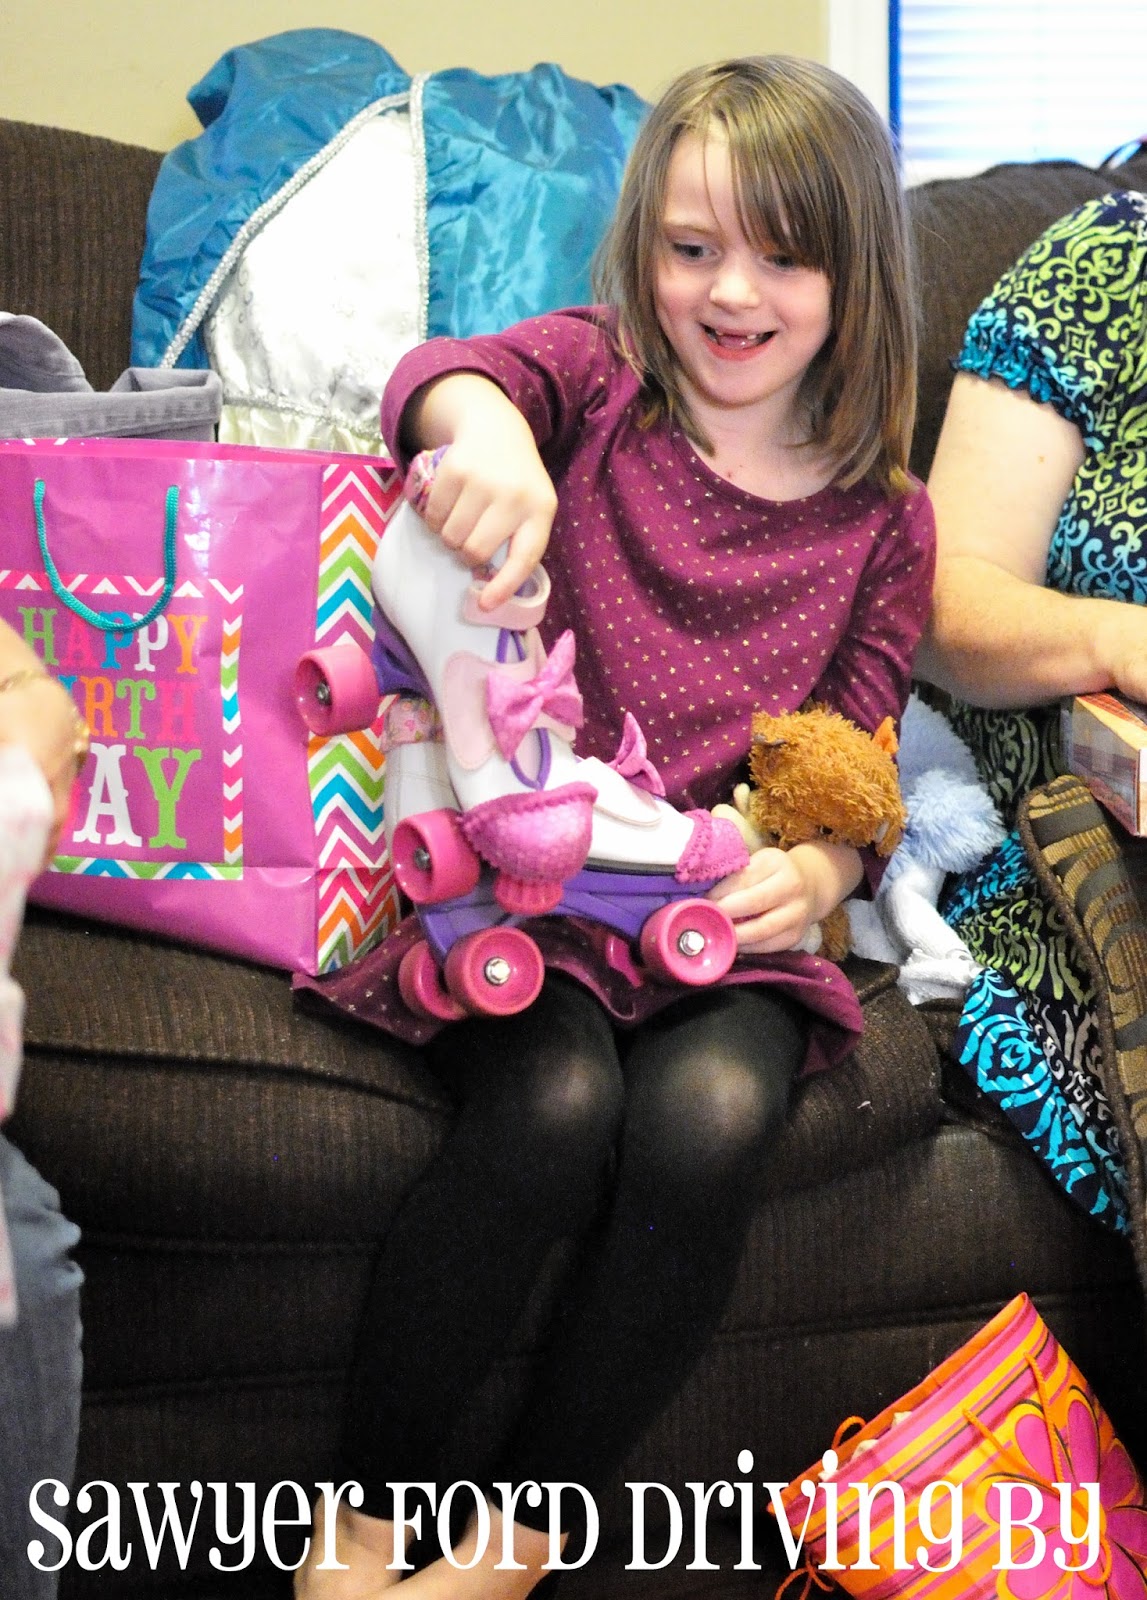
As you can see, she was pretty excited about them. In fact, she stopped everything to go find a pair of socks and put them on immediately. Her Nana and Papaw bought her knee and elbow pads and a helmet a few days later, and she's been skating her heart out in the garage ever since. She's gotten really steady on them, and I'm excited to get to take her back to the skating rink.


Wednesday, January 14, 2015

The Christmas Season

Guys, I finally have my computer back! I'm so excited! It took forever, but it's good as new now, and I can't wait to get to posting again!

Did you guys have a good Christmas and New Year's? Our New Year's was less than ideal, sick babies and selves, and Sawyer threw up on me and Nick in literally the last 10 seconds of 2014. Yuck!

But we're all better now, and our Christmas was great! I've got lots of things to share with you, but I wanted to start out with a few pictures I took this year.

These were from sessions I did with my niece and nephews.

Levi and Adelaide


Lawrence

This one was their Christmas card this year.


And here are a few from our little church Christmas play service.


Sawyer Ford (literally) Driving By
My Mom and Dad with all 6 grandbabies.

All the grandbabies in their Christmas pj's on Christmas Eve.

A couple of the cowboys patrolling the range this year. They were all SO cute!


This was such a blessed Christmas season, and we have so much to be thankful for!

Monday, December 29, 2014

So I haven't actually ridden off into the sunset...

I've been a wee bit scarce around here of late, and it will be just a wee bit longer before I can get back to regular posting, but I have a good reason. First of all, the holidays were CRAZY, but in a good way. But it's had me busy mostly every day, between photo shoots, finishing up Christmas gifts, and attending multiple family and work (Nick's) events. And then there was the tea. Sawyer somehow managed to knock a cup of tea halfway across the couch onto my poor laptop, which I was actually using at the time. Fortunately it's still under an extended warranty protection plan, so it's being sent off to be repaired, which I'll certainly be glad to get done, but in the meantime I'm without means to post photos, a circumstance that isn't quite conducive to being a successful craft blogger. SO...hang in there for me. When I get back I'll be posting all about the Christmas gifts I made, as well as a few other crafts I've got lined up. Happy New Year!

Tuesday, December 2, 2014

Thanksgiving Outfits

Did you guys have a good Thanksgiving? Ours was wonderful! Phenomenal food, a truly wonderful time with the whole family together, and babies, babies, babies! This year the 5 and under set included Lily - 5, Sawyer - 2, Levi - 2, Lawrence - 1, and Adelaide - 6 1/2 months.

A few weeks ago my sis-in-law and fellow Pinterest addict Rachael and I were oohing and aahing over some cute little dresses online, and we decided that we should make matching Christmas dresses for Lily and Adelaide. Then we decided that we might as well go ahead and come up with something cute for them to wear for Thanksgiving. And if we were going to make the girls matching dresses, we couldn't leave their brothers out. So we decided to make Sawyer and Levi matching turkey shirts. And of course if we were going to make them for Sawyer and Levi, their cousin Lawrence was going to need one too. And if Sawyer, Levi, and Lawrence were going to be little gobblers, then we certainly had to make one for Jackson, their honorary cousin. You can see how my crafting gets out of control.

So anyway, Rachael, my sis-in-law Leah (Lawrence's mom) and I got together for a day of sewing, and we made dresses for the girls and shirts for the boys.

I made Sawyer a turkey onesie like this for his first Thanksgiving when he was not quite 11 months old. I've mentioned that he was a preemie, and while he's all caught up now, for a long time he was very small for his age. I just have to show you what a ridiculously cute, tiny little turkey he was in 2012. This was a 3 month onesie.


Gah! Why isn't he so tiny anymore?

Anyway, we decided to make peasant dresses for the girl with their initial appliqued on them. We followed this tutorial, and let me tell you: Mind. Blown. This was SO easy! I'm going to make tons of these! In fact, it's what we'll make for them to wear for Christmas too, and I already have the perfect corduroy pulled out to make one as a Christmas gift for Lily. And I plan on making a matching one for her doll. I also made one for my friend Amy's little girl's birthday, and I barely got it out the door without Lily claiming it, despite it being 3 sizes too small for her lol.

Please excuse the picture. I ran out of time to shoot it at home, so I snapped a quick pic of it laid out on the Jake and the Neverland Pirates coloring table at the party. :)

Here are Lily and Addie in their matching dresses and headbands.


It's hard to see the monograms here, but Lily's has an L and Addie's has an A in brown corduroy just above the hem on the right side.

And the turkeys...


Want to see the back? Here you go...


Which of course quickly turned into this:


Not to worry, soon they were best buddies again. :)


The shirts were just purchased black t-shirts with turkey faces and feathers hand cut from eco-felt and just sewn on with a straight stitch. We even freehanded the pieces. Easy peasy!

Tuesday, November 25, 2014

The Fault in Our Stars Earrings


Have you read The Fault in Our Stars? Have you seen the movie? I read the book on my Kindle, then took Taylor to see the movie this past summer. And yes, we totally cried. Not quite like the lady behind us though. She was hardcore loud ugly-sobbing through pretty much the whole movie. I kind of felt like I should get her a Gatorade when it was over. Whoever you are, lady, I hope you eventually recovered. You know, fiction and all. But anyway.

One of the most beloved parts of both book and movie is the gentle banter between Gus and Hazel where they have a hard time hanging up the phone and keep stretching out the conversation with "Okay?" "Okay." "Okay?" "Okay."....and it becomes their thing. Their always.


I've seen all kinds of memes and pictures all over the internet honoring that little word, not to mention tons of accessories, many of them DIY. So I thought I would try my hand at a project of my own. I asked Taylor to give me a hand, and together we made up three styles of TFiOS themed earrings.


For this easy project I pulled out one of my favorite crafting materials: Shrinky Dinks. I used a sheet of the frosted and a sheet of the opaque white. Before you get started on cutting out your clouds, turn your oven on to 325° to preheat. Now, to cut out the clouds I used a Fiskars X-Large Cloud Squeeze Punch. You can totally cut these out by hand if you don't have a cloud punch. In fact, my first version of this was a set of best friends backpack tags I cut out by hand for Taylor and her bestie, and they disappeared immediately. But they were about 3 times the size of the earrings, and my cutting skills on anything small are highly suspect.


I'm going to show you the steps to make all three pairs of earrings at once. Of course if you just want to make one pair, just follow the directions for the pair you want. The first pair will require one cloud punched from each sheet, and the second and third pairs will each require two clouds cut from each sheet. So to make all three pairs, cut 5 clouds from the opaque white and 5 clouds from the frosted. A quick note: I made all my earrings with the white cloud on top and the black cloud on the bottom. Apparently this is backwards. But this is my blog, so nyah, nyah, nyah, nyah, nyah! If you want to make them the "right" way, just switch all the black and white clouds in the instructions. No biggie.


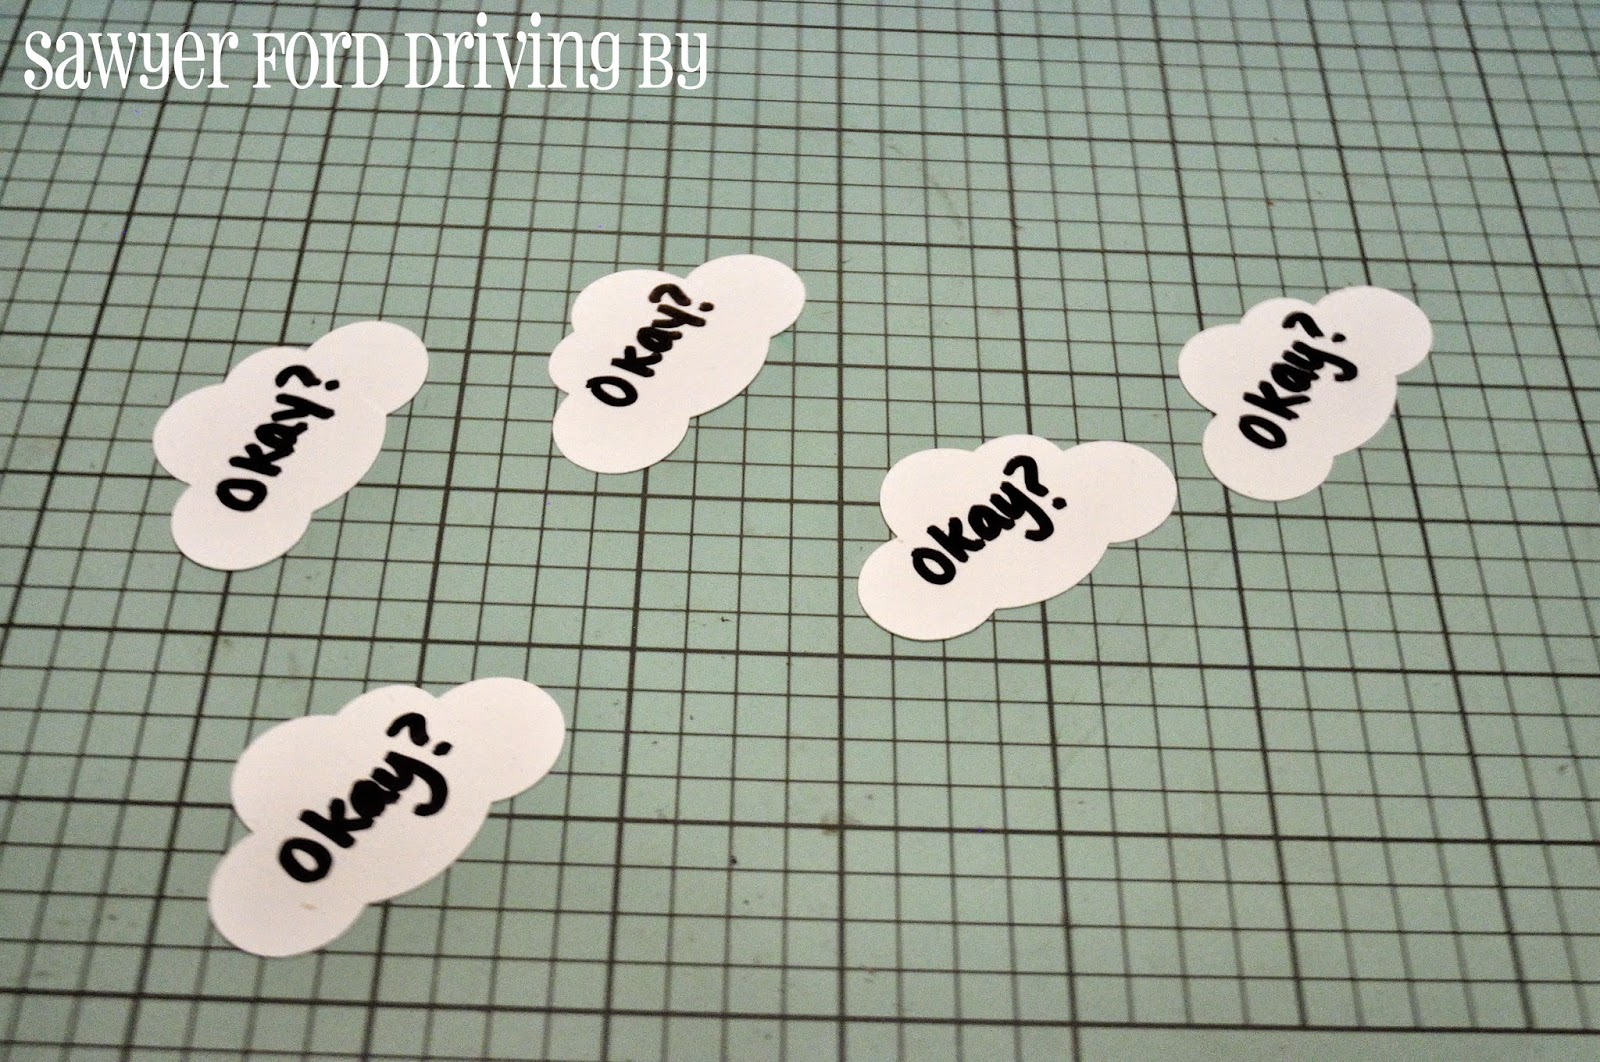
Imagine you see 5 frosted clouds here too. You'll see them in a minute.

Take your 5 frosted clouds (see?) and color them completely with black Sharpie. Color on the rough side. Taylor helped me with this.


Let these dry for a minute, and in the meantime take your 5 white clouds and use your black Sharpie to write {Okay?} on each one. Write it as neatly as you can, but you're going for a handwritten look here.


Now take your black clouds and, using a silver Sharpie, write {Okay.} on each of them. You can write on either side. I chose to write on the rough side, because sometimes the shiny side tends to show a little scuffed after baking.

Now we're going to punch the holes for our jump rings. When you bake Shrinky Dinks, any holes shrink right along with the rest of it. For the tiny jump rings I'm using, a 1/8 inch punch makes a hole that shrinks to just the right size, but if you only have bigger jump rings, you might want to use a 1/4 inch hole punch. These are the holes you will punch for each pair. You can click on the picture to make it bigger if you have a hard time reading it.


Once you have your holes punched, place your clouds writing side up on a piece of paper on a cookie sheet. I usually use a lunch sized paper bag.


Slide them in the oven to bake, checking them after about 90 seconds. At that point mine were still curled up a bit, but a few seconds later they were all lying flat, which is how you know they're done.


When I take Shrinky Dinks out of the oven, I press them quickly with an acrylic stamp block, just to make sure they're all nice and flat.


See how much smaller they are? 


Now we're going to attach our findings. Here are the findings you'll need for each pair. Again, click the picture to make it bigger if you need to.


For the first pair, just glue your earring posts right to the back. You will be using one white cloud and one black cloud, both hole-free. I actually just used high temp hot glue for these, and they've held up fine. Taylor has worn them several times and they're still holding fast. But you can absolutely use something like E6000 if you prefer. Just make sure you let them sit for the instructed amount of time before wearing.


Add your earring backs and you're done!


For the next pair, you're going to use a jump ring to attach a black cloud with a hole punched in the top to a white cloud with a hole punched in the bottom. Repeat for the other earring. 


Now glue your posts to the backs of the two white clouds and add your earring backs.  Done!


For the last pair, attach your black and white clouds together like you did on the last pair, then carefully open the loop at the bottom of your earring hook with a pair of round nose pliers. 


Loop it  through the hole at the top of the white cloud, making sure to put it on so that the clouds will face front when you wear them. Carefully squeeze the loop closed with flat or needle nosed pliers, being careful not to crush it. Repeat for the other earring and attach the backs. All done! Now you'll be the envy of your book club!


I had so much fun making these that I whipped up another couple of pairs using different punches I had. These were made with a Fiskars Large Cupcake Squeeze Punch. Aren't they fun?


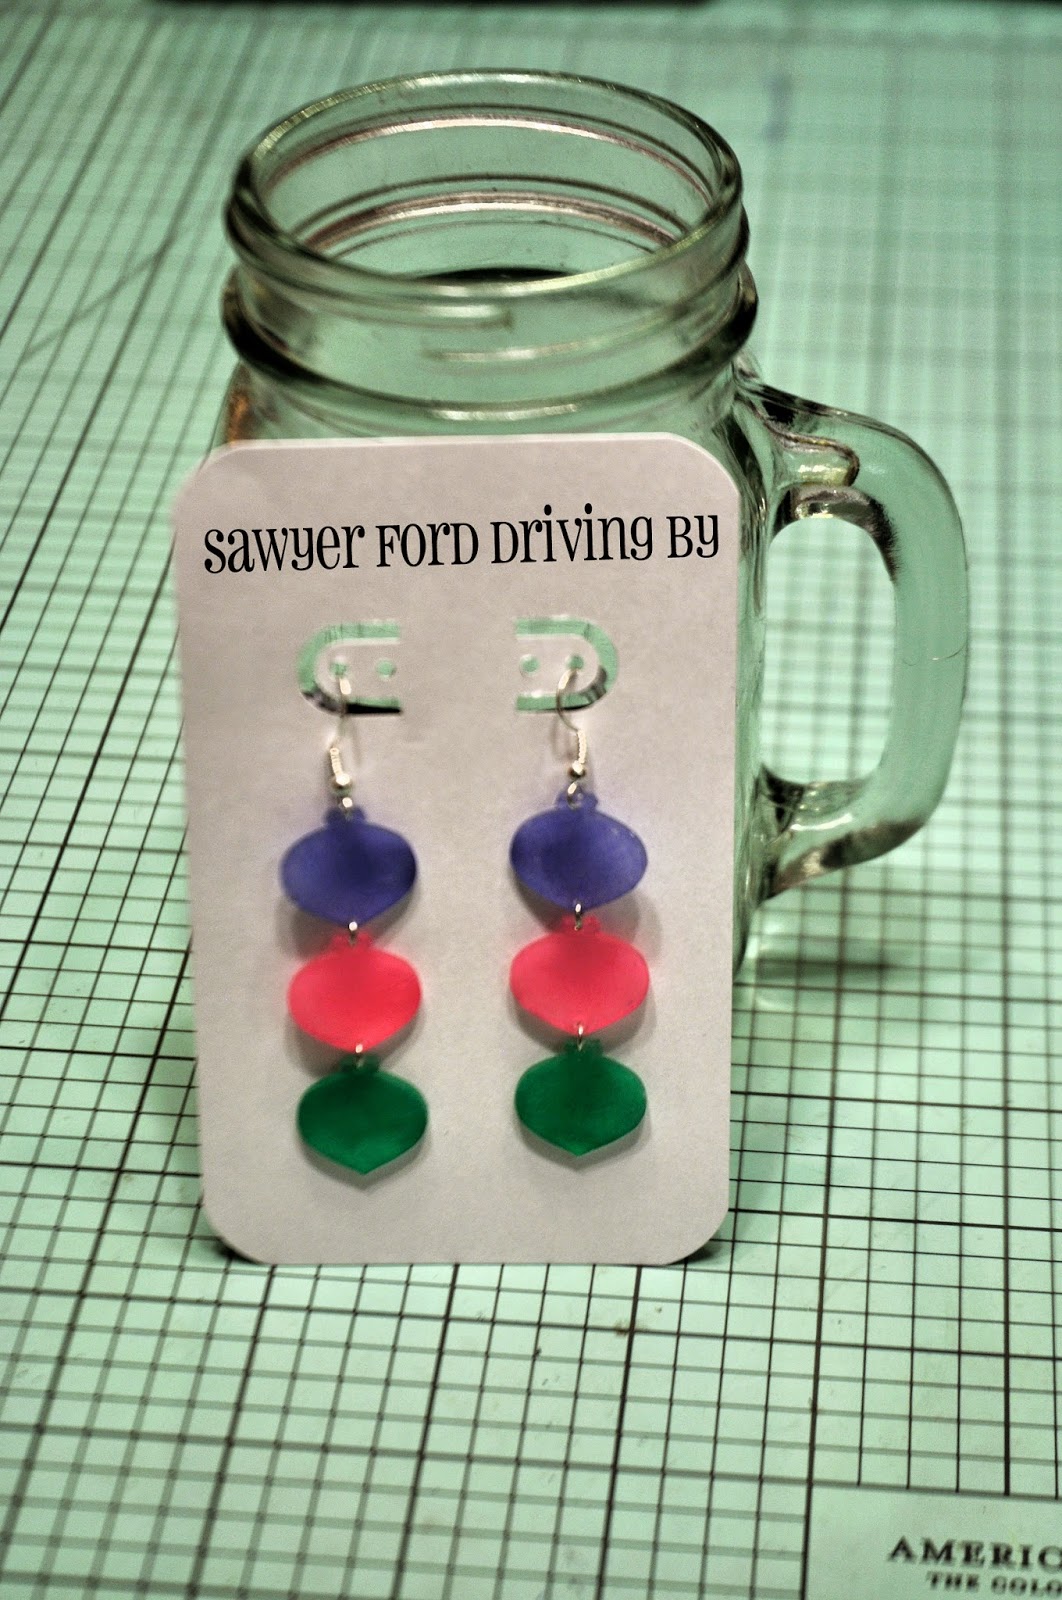
And the other day I found this retired Stampin' Up ornament punch for $2.99 at the thrift store they just opened up practically walking distance from my house! Score! (On both the punch and the new thrift store!) It turns out there are entire Pinterest boards dedicated to all the things you can do with this punch. Seriously. I'm so excited! I punched 6 ornaments from frosted Shrinky Dinks and colored them with pastel Sharpies. They turned out with this cool stained glass effect, and I love them!


I may end up going over the edges with a silver paint pen as well. I haven't decided yet. I love how many options there are with this craft! Shrinky Dinks are always a winner around here!